Epoxy Workshop
Drew Boettner lead the lab in a workshop focusing on teaching how to bond tank shells together by preparing a surface for bonding, preparing and mixing epoxy, and how to effectively join two surfaces together and leaving them to cure.
Here are the outlines of his stations and their goals:
Station 1: Preparation of Surfaces for Epoxy Adhesive Bonding
What you need to know!
A clean, dry surface is a prerequisite for adhesive bonding; and adhesives will either stick to the surface to which a bond is desired or to a film of extraneous material directly on that surface. Rarely can a structural adhesive penetrate through surface contaminants to provide an optimum bond on an unclean surface.
Porous materials are simple to bond to, providing they are dry. Non-porous surfaces, as found on metal and plastic materials, should be degreased, dried, and roughened by sanding, sandblasting, or chemical etching. For best results, surfaces can be prepared by three pretreatment procedures, which are listed by increasing effectiveness.
1. Degrease only.
2. Degrease, abrade, and degrease again.
3. Degrease and chemically pretreat.
Exercise
Safety and PPE
- Gloves and eye protection are required for all steps. Be mindful of fumes from solvents and always work in a well-ventilated area.
Clean/Degrease
- Using the appropriate materials, abrade the surface if applicable.
- Using the appropriate solvent and kimtech wipes, clean the bonding surface
- Allow the solvent to evaporate and repeat 3 times.
- Using ethanol and kimtech wipes, wipe away any remaining residue. Do this only once.
- Use canned air to remove any debris remaining from kimtech wipes.
- You’re done! Do not touch the surface after this step. Even small contaminations can create improper bonding.
Questions
- We are bonding two pieces of a SLS 3D printed nylon 11 together. What sort of surface preparation should we do and why?
- Would you use methanol to clean this material? Why?
- Why did we not sand/abrade the surface?
- If we sand/abrade a surface, what do we use in addition to the abrasive?
Station 2: Preparing the Epoxy
What you need to know!
Each epoxy will have specific instructions, but for most epoxies the directions will be identical or very similar. Most epoxy compounds have two parts, a resin and a curing agent, that must be mixed together in a specified ratio for a specified duration. Once mixed you’ll have a window of 15-45 minutes before the resin is too hard to work with.
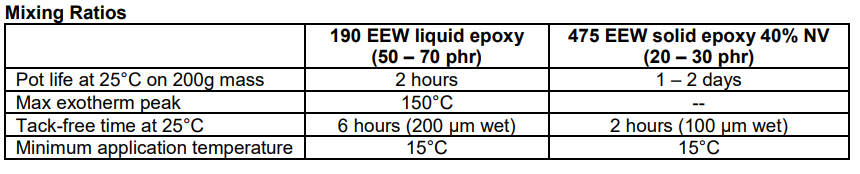
Always consult the safety data sheet (SDS) before working with an epoxy. For this station, we will be mixing Versamid 140 and Epon 190 EEW liquid epoxy. The mixing ratio for the epoxy is 50-70 phr, which means Epon 190 EEW should be 50-70% by weight of the mixture. This must be mixed for 5 minutes. See the table below for more information.
Exercise
Safety and PPE
- Gloves and eye protection are required for all steps. Be mindful of fumes from solvents and always work in a well-ventilated area.
Preparing the Epoxy
- Place a cup on the scale and press tare. The value should be 0 with the cup on the scale.
- Measure out 10 grams of curing agent.
- Coat the end of a popsicle stick with curing agent and carefully drip into the cup.
- Once the scale reads 10.0 grams, dispose of the popsicle stick and cap the bottle of curing agent.
- Measure out 10 grams of resin.
- Coat the end of a popsicle stick with the resin and carefully drip into the cup.
- Add as much resin (at least 10 grams) then dispose of the popsicle stick.
- Mix the epoxy for 5 minutes. The final mixture should be a white milky color.
- You’re done! Remember, the pot life for this mixture. Bring this mixture to the next station.
Post Questions
- How can we check that our epoxy is properly mixed?
- Do we mix by volume or by mass? How do you know?
- Which one is the resin, and which one is the curing agent?
Station 3: Bonding Tank Shells
What you need to know!
Tank shells are printed in two halves, joined together through a lap joint.
Exercise
Safety and PPE
- Gloves and eye protection are required for all steps. Be mindful of fumes from solvents and always work in a well-ventilated area.
Bonding the Tanks
- Put on a fresh set of gloves to ensure not to bring any mess from the previous station with you!
- Bring the epoxy you mixed in the previous step. Use the popsicle stick to apply to the surfaces highlighted in red in the image above.
- Ensure the whole surface is covered, do your best to not allow any epoxy to drip anywhere but the surfaces outlined in red.
- Connect the two surfaces. If your bond is radial, rotate the tank back and forth ¼ turn as you do this.
- At this point, a bead of epoxy should have oozed from the joint. Use a popsicle stick to smooth the bead.
- Once the bead is smooth, apply a layer of tape to flatten the bead and create a barrier to flow (see next page).
- You’re done! Leave to cure for at least 6 hours (see SDS).
Post Questions
- How should we place the tank while the epoxy cures?
- How do we know we have a good bond between surfaces?
- Where should we apply the epoxy?
Curing
- Place the tank upright to cure. The tape will act as a barrier to the epoxy flow out of the joint. If the tank is not placed manifold side up, the epoxy will flow out of the joint and into the inside of the tank.
Appendix 1: Pretreatment for Common Materials [1]
Acrylic Glass (Perspex, Resartglas).
- Degrease (detergent solution).
- Abrade (emery cloth).
- Remove dust with dry-air (or non-clouding solvent).
Aluminum and Aluminum Alloys
- Degrease with trichloroethylene.
- Dip in the following solution for ten minutes (for certain alloys, such as No. 360 only one to three minutes is required):
3 parts sodium dichromate
10 parts 96% sulfuric acid
20 parts water
(Be careful to dissolve sodium dichromate in the water, then add the sulfuric acid slowly).
- Rinse in ambient tap water.
- Rinse in hot (150-170°F.) distilled water.
- Air dry.
Cadmium
- Degrease with trichloroethylene.
- Abrade with emery cloth or sandblast.
- Degrease.
Cast Iron
- Degrease with trichloroethylene.
- Abrade surface (sandblast or emery cloth).
- Degrease.
Concrete
- Remove 3mm of surface to be bonded by mechanical scarification or 1.5mm sandblast.
- Remove dust particles (preferably by vacuum cleaner).
Copper, Brass and other Copper Alloy
- Degrease with trichloroethylene.
- Dip in a solution consisting of 6 parts ferric chloride, 30 parts 70% nitric acid and 200 parts water. (Dissolve the ferric chloride in the water, add the nitric acid slowly). OR dip in a 25% aqueous solution of ammonium persulfate for 1-2 minutes.
- Rinse with distilled water and dry.
Epoxy Resin Moldings and Castings
- Remove release agent with solvent.
- Abrade surface (emery cloth).
- Degrease.
Ferrous Alloys other than Stainless
- Degrease with trichloroethylene.
- Sandblast, sand (100 grit) or etch in 15% aqueous hydrochloric acid (equal parts concentrated muriatic acid and water) for 10 minutes. Etched surfaces should be rinsed immediately and dried with hot air. Freshly sandblasted or etched steel begins to rust immediately; therefore, adhesive should be applied as soon as the surface has been prepared.
Foam Plastics (polystyrene and polyurethane)
- Sand lightly to remove any release agent or residue.
- Clean surface (do not use solvents).
Graphite and carbon
- Degrease with trichloroethylene.
- Abrade with fine emery cloth.
- Degrease.
Leather
- Degrease.
- Rough with glass paper.
- Degrease.
Magnesium and Magnesium Alloys
- Degrease with trichloroethylene.
- Abrade with emery cloth.
- Degrease.
Plaster
- Allow surface to dry.
- Sand surface and remove dust.
Polar Thermoplastics (Nylon, ABS, Polycarbonate, Acrylate).
- Degrease with acetone, methyl ethyl ketone or trichloroethylene.
- Mechanically abrade.
- Degrease.
Polyester Resins
- Degrease
- Abrade with emery cloth or steel wool.
- Degrease with acetone or methyl ethyl ketone.
Precious Metals
- Degrease.
- Abrade with fine emery cloth (optional for tarnished metals).
- Degrease.
Precious Stones
- Degrease.
Rubber
- Adhesion is considerably improved using a chlorination treatment.
- Make a solution by volume as follows: 100 parts water; 3 parts Clorox (5 ¼% sodium hypochlorite); ½ part concentrated hydrochloric acid.
- Immerse rubber in solution for 1-3 minutes, rinse and dry. Use only fresh solution.
Polyethylene, Polypropylene.
- Degrease with trichloroethylene.
- Oxidize by immersing a solution consisting of 7 parts sodium dichromate, 10 parts water and 150 parts concentrated sulfuric acid for 10-15 minutes.
- Rinse with hot distilled water.
- Dry and coat with adhesive immediately.
Stainless Steel, Chromium
- Degrease with trichloroethylene.
- Etch with concentrated hydrochloric or muriatic acid for 15 minutes at room temperature or with a solution consisting of 90 parts water, 40 parts 96% sulfuric acid, and 0.2 parts Nacconol NR (National Aniline) for 10 minutes at 150° F. followed by 10 minutes at room temperature in a solution consisting of 90 parts water, 15 parts 70% nitric acid, and 2 parts 48% hydrofluoric acid.
- Rinse in hot distilled water and dry with hot air.
Stone, Ceramics, Glass
- Degrease with trichloroethylene.
- Wire brush (stone), sandblast.
- Rinse with water and dry.
Teflon
- Degrease with chlorine free solvents.
- Etch with sodium solution.
- Rinse and dry.
Thermoset Plastics (Epoxies, Polyurethane, Polyester, Melamine, Phenolic, PVC).
- Degrease with acetone, methyl ethyl ketone or trichloroethylene.
- Mechanically abrade (sandblast).
- Degrease.
Titanium
- Degrease with trichloroethylene.
- Mechanically abrade (emery cloth or steel wool).
- Degrease.
Tungsten and Tungsten Carbide
- Degrease with trichloroethylene.
- Mechanically abrade (emery cloth or grit-blast).
- Degrease.
Wood
- Sand until clean. Ensure wood is dry (moisture content not higher than 8-12%).
- Wipe surface with solvent. (Wood free of grease requires no pretreatment).
Wrought iron and mild steel
- Degrease with trichloroethylene.
- Mechanically abrade (sand-blast or emery cloth).
- Degrease.
Zinc, Lead, Nickel and Tin
- Degrease.
- Mechanically abrade (sandblast).
- Degrease.
Appendix 2: Cryogenic ‘Sticky Stuff’
[1] J. Ekin, “Experimental Techniques for Low-Temperature Measurements: Cryostat Design, Material Properties and Superconductor Critical-Current Testing,” Experimental Techniques for Low-Temperature Measurements: Cryostat Design, Material Properties and Superconductor Critical-Current Testing, vol. 9780198570547, pp. 1–704, Oct. 2006, doi: 10.1093/ACPROF:OSO/9780198570547.001.0001.
[2] Preparation of Surfaces for Epoxy Adhesive Bonding
https://www.smooth-on.com/page/preparation-surfaces-epoxy-adhesive-bonding/